at_chats
4 minute read
The at_chat_flutter widget offers a messaging experience that is unique to the @platform. In a traditional messaging application, your texts are stored in a remote database and the person you’re pinging pulls the texts from there (a bit unsettling if you think about it). Of course, there is no such thing as a remote database in the @platform, so we had to be a bit clever coming up with a messaging scheme. In a nutshell, your text messages are not “sent” but rather “shared” with another @sign. All your texts are stored securely in your secondary server and never leave; if you decide to send a message to someone, that person is given permission to view that text via the notify verb. You can see use cases of the notify verb in the at_cookbook sample app.
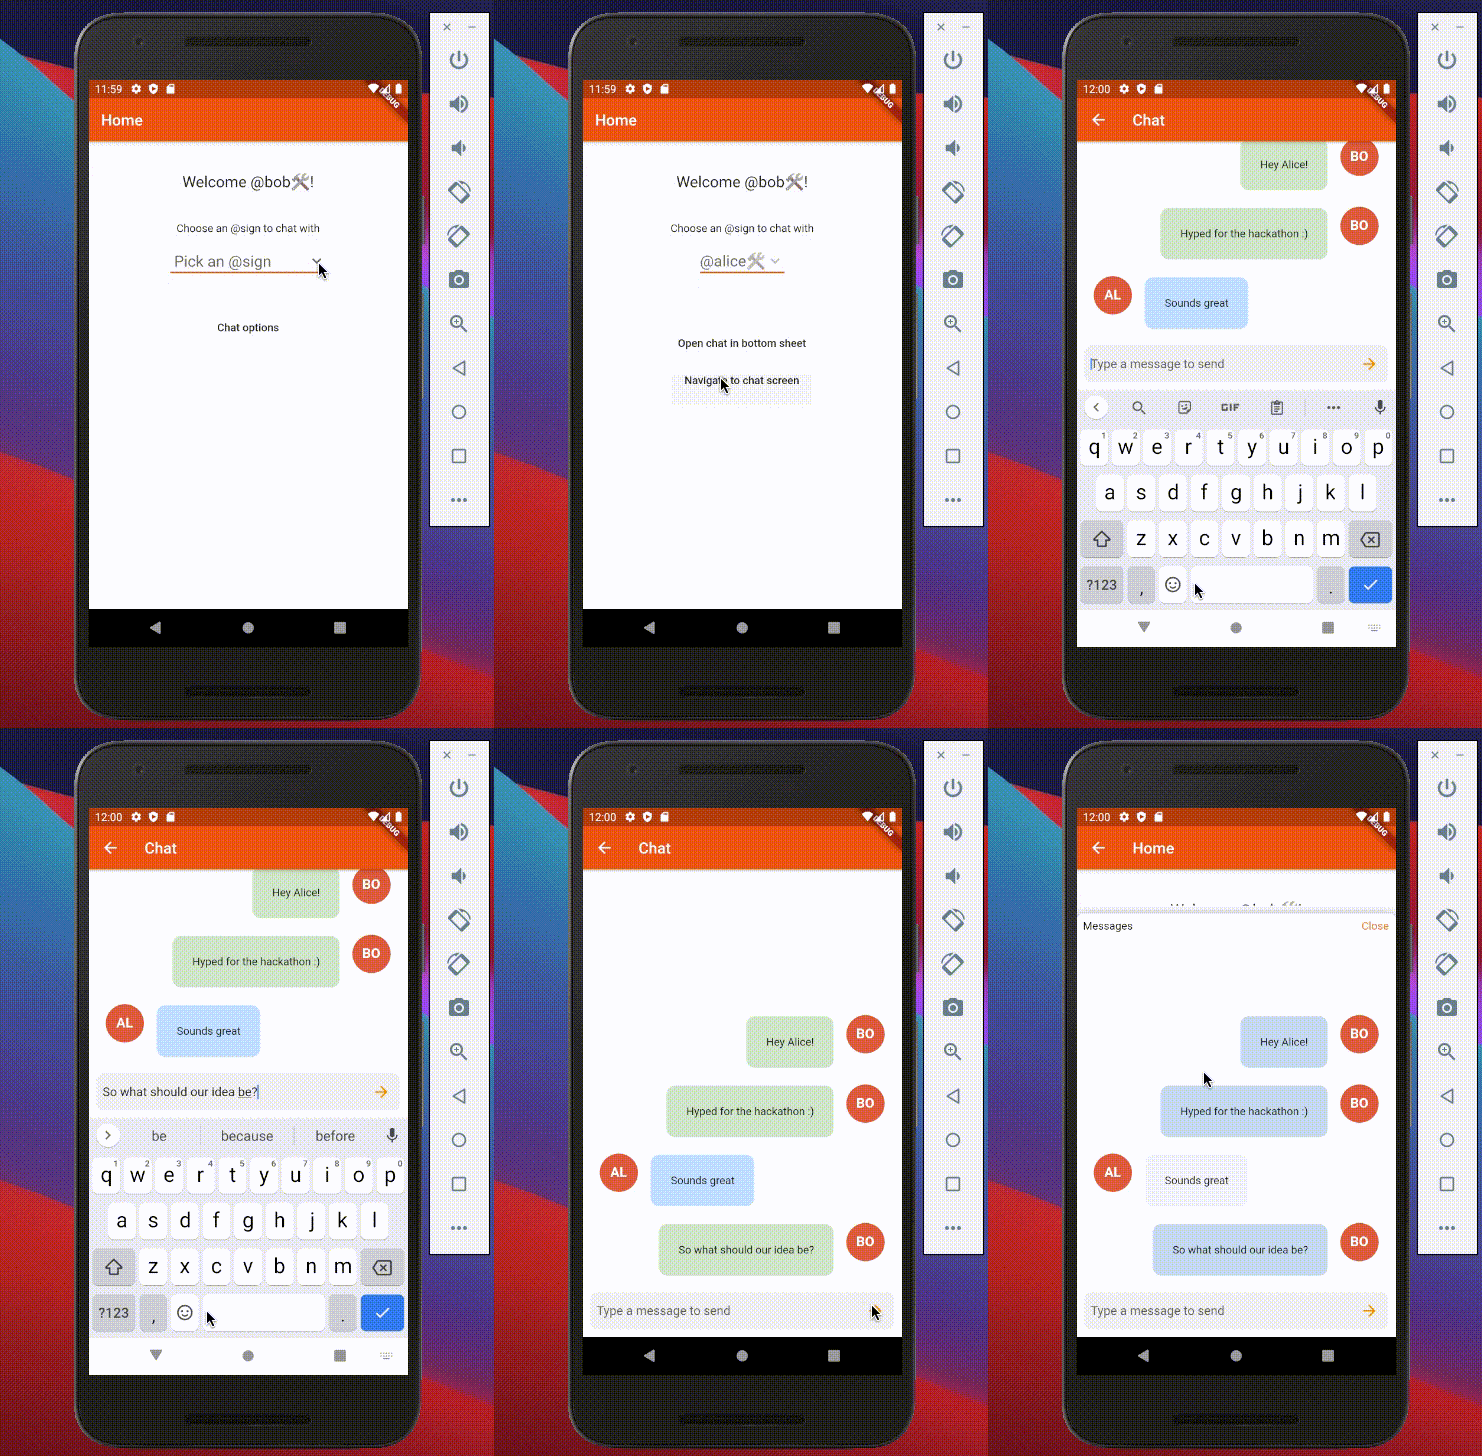
Below, you can see a small demonstration of how the at_chats application works.

tl;dr
Overview too long for you? Watch the Tyler Time episode that covers this instead!Overview of the at_chats app
Although this messaging dynamic might sound a bit involved, set up is quite easy! To get a feel for using the “Chatting” widget, it’s best to follow along with the at_chats demo application.
The general flow of all @platform widgets is onboarding an @sign => initializing the service object => creating the actual widgets. Assuming we’ve already onboarded an @sign, let’s look at the steps to initialize our chat service:
(The following code snippets are taken directly from at_chats. While there will be explanations, don’t worry too much about all the variables!)
getAtSignAndInitializeChat() async {
 /// In the at_chats app, the onboarded @sign is displayed at the top
 /// of the Second Screen. We set that @sign to [currentAtSign].
 String currentAtSign = await clientSdkService.getAtSign();
 /// Set [activeAtSign], which is the variable that gets displayed, to
 /// [currentAtSign] using setState(() {}).
 setState(() {
   activeAtSign = currentAtSign;
 });
 /// Initialize a List of Strings called [allAtSigns] that we will
 /// eventually display in the dropdown on the Second Screen. Here, we
 /// simply pull an existing List from the at_demo_data dependency.
 List<String> allAtSigns = at_demo_data.allAtsigns;
 /// We want to remove the [activeAtSign] from this List because we
 /// can't chat with ourselves!
 allAtSigns.remove(activeAtSign);
 /// Again, call setState(() {}) to assign [allAtSigns] to the
 /// variable [atSigns] that will be used in the dropdown widget.
 setState(() {
   atSigns = allAtSigns;
 });
 /// This is the only at_chat_flutter related function!
 /// initializeChatService takes in an AtClientImpl instance, the
 /// currently onboarded @sign, and the root domain for this project.
 /// As its name suggest, this function will prepare the chat service
 /// for us.
 initializeChatService(
     clientSdkService.atClientServiceInstance.atClient, activeAtSign,
     rootDomain: MixedConstants.ROOT_DOMAIN);
}
Because getAtSignandInitializeChat() is an initialization function, it is best to call it in the initState() function at the top of the _SecondScreenState class. The only other thing we need to do before calling the “Chatting” widget is deciding who we’d like to chat with.
setAtsignToChatWith() {
 /// This function is as simple as calling the setChatWithAtSign()
 /// function from the at_chat_flutter dependency with
 /// [chatWithAtSign] passed in! [chatWithAtSign] is simply the @sign
 /// that a user selects from the dropdown on the screen.
 setChatWithAtSign(chatWithAtSign);
}
We won’t want to call setAtsignToChatWith() in initState() because the function won’t know which @sign we’re communicating with until the individual selects it from the dropdown widget. Instead, it makes the most sense to place this function in the button (FlatButton for the at_chats app) that determines the navigation to the next screen. For at_chats, clicking the “Chat options” FlatButton will check to make sure that the “chatWithAtSign” variable is populated before it calls setAtsignToChatWith() and switches the “showOptions” variable to true, which allows the individual to see the two options for viewing the chatbox.
Now, for the moment of truth: once we’ve initialized the chat service, how do we create the actual chat screen? In most tutorials, you’ll probably be guided through a UI-heavy demo of different chatbox components and pairing a backend service. With the @platform, however, it’s really just one line of code:
(This snippet is directly from third_screen.dart in the at_chats project!)
class _ThirdScreenState extends State<ThirdScreen> {
 @override
 Widget build(BuildContext context) {
   return Scaffold(
     appBar: AppBar(title: Text('Chat')),
     /// You can simply set the body parameter of Scaffold widget
     /// to the ChatScreen widget from the at_chat_flutter dependency!
     body: ChatScreen(
       /// Optional parameters to customize your ChatScreen widget.
       /// You can find the full list of parameters in our Github
       /// under the at_widgets repository.
       height: MediaQuery.of(context).size.height,
       incomingMessageColor: Colors.blue[100],
       outgoingMessageColor: Colors.green[100],
       isScreen: true,
     ),
   );
 }
}
By initializing the chat service and calling the ChatScreen() widget, you can make a fully-functioning one-to-one messaging application! While the ChatScreen widget offers a number of ways to customize your chatbox, if you’d like to build your own widget from scratch, you can use the at_chat_flutter dependency as a basis for creating your personal chat library that works with the @platform.