The @platform widgets
19 minute read
The Onboarding Widget
Onboarding for the first time with the @platform isn’t as simple as choosing your @sign from a dropdown menu and clicking “Login” (after all, how would the application know where to retrieve your authentication keys from a given @sign?).
Implementing onboarding from scratch would be painstakingly difficult. Not only would you have to code the PKAM logic, but you would also have to build your own QR code scanner to extract the CRAM (Challenge-Response Authentication Mechanism) key from your @sign’s QR code generated on our website! Atsign realized this very quickly, so we developed the at_onboarding_flutter widget to help developers who want to build production-level apps that onboard real @signs (AKA @signs that you get from our .com site).
Learn more about the onboarding widget here!
Note
This dependency value may not be up-to-date so be sure to check it out on our pub.dev!Use this package as a library
at_onboarding_flutter: ^1.0.0+4
The “Onboarding” widget is very handy in that you do not need to call the “onboard” or “authenticate” methods from the service file of the application to get it running. Instead, it will ask us to specify the following parameters (descriptions for each parameter are written in the comments):
class Onboarding {
 ///Required field as for navigation.
 final BuildContext context;

 ///Onboards the given [atsign] if not null.
 ///If [atsign] is null then it takes the atsign from keychain.
 ///If [atsign] is empty then it directly jumps into authenticate
 ///without performing onboarding. (or)
 ///If [atsign] is empty then it just presents pairAtSign screen
 ///without onboarding the atsign. (or)
 ///Just provide an empty string for ignoring existing atsign in
 ///keychain or app's atsign.
 final String atsign;

 ///The atClientPreference [required] to continue with the onboarding.
 ///atClientPreference is an instance of a class in the
 ///at_client_mobile library that stores a number of important
 ///attributes like the namespace of the application, the CRAM key of
 ///an @sign, the root domain we want the project to communicate
 ///with, and so on.
 final AtClientPreference atClientPreference;

 ///The root domain for our project. By default, the plugin connects
 ///to [root.atsign.org] to perform onboarding.
 final String domain;

 ///The color of the screen to match with the app's aesthetics.
 ///default it is [black].
 final Color appColor;

 ///If logo is not null, then it displays the widget on the left side
 ///of appbar. Else, it displays nothing.
 final Widget logo;

 ///Function returns atClientServiceMap on successful onboarding along
 ///with onboarded @sign. Assign these returned values to the relevant
 ///variables in your project’s service file.
 final Function(Map<String, AtClientService>, String) onboard;

 ///Function returns error if onboarding fails for an @sign.
 final Function(Object) onError;

 ///After successful onboarding, the app will be redirected to this
 ///screen if it is not null.
 final Widget nextScreen;

 ///After the first successful onboarding, the app will get redirected
 ///to this screen if not null.
 final Widget fistTimeAuthNextScreen;

 final AtSignLogger _logger = AtSignLogger('At Onboarding Flutter');

 Onboarding({Key key,
   @required this.context,
   this.atsign,
   @required this.onboard,
   @required this.onError,
   this.nextScreen,
   this.fistTimeAuthNextScreen,
   @required this.atClientPreference,
   this.appColor,
   this.logo,
   this.domain})
 ...
}
To see an actual implementation of the onboarding widget, let’s revisit the _login function in the at_hello_world app with some updated code:
/// Return an “Onboarding” widget that walks the individual through
/// the onboarding procedure for any real @sign.
_login() async {
 return Onboarding(
     context: context,
     /// Ensure that the “root” attribute is assigned to
     /// “root.atsign.org”
     domain: AtConfig.root
     atClientPreference: await
        _serverDemoService.getAtClientPreference(),
     appColor: Color.fromARGB(255, 240, 94, 62),
     onboard: (atClientServiceMap, atsign) {
       _serverDemoService.atClientServiceMap = atClientServiceMap;
       _serverDemoService.atSign = atsign;
     },
     onError: (error) {
       print(error);
     },
     /// Remove the constructor in HomeScreen. You can call the @sign
     /// with the getAtSign() method in the service file.
     nextScreen: HomeScreen(),
 );
}
All of the parameters in the “Onboarding” widget can be populated very easily with either methods from the project’s service file (e.g. getAtClientPreference()) or special variables from the app itself (e.g. context). “Onboarding” is capable of handling all instances of an @sign (e.g. a particular @sign does not exist, a particular @sign exists but needs to be paired with a QR code to the device, a particular @sign exists and its keys are already in the device’s keychain manager). By using this widget, what would have taken several screens and many lines of code can be completely bypassed with a single return statement!
That’s all for the “Onboarding” widget. Before moving on from this subsection, we highly recommend implementing the widget in your own application and onboarding a real @sign to understand its intended user journey. If you’re interested, these are the steps to implement the “Onboarding” widget in the at_hello_world project:
Update your Android Studio, Flutter SDK, and Dart SDK to their latest versions. Place the atonboarding_flutter dependency in pubspec.yaml. Follow the setup procedure for the “Onboarding” widget in the “AndroidManifest” (android -> app -> src -> main -> AndroidManifest.xml) and “gradle” file (android -> app -> build.gradle) of the at_hello_world project. You may also need to update the “classpath” of the android gradle build tool to 3.5.4 (this can be done by going to android -> gradle -> build.gradle and editing the first classpath in the “dependencies” brackets). This must be completed in order to set up the permission for the QR code scanner to access your camera. Find those steps on the pub.dev site for at_onboarding_flutter here. Get a free @sign from atsign.com. Generate its QR code, and drag/drop the created file directly into the emulator. Confirm that the QR code image appears in the “Files” or “Drive” app of the emulator you’re using (assuming that it is an Android emulator). In “at_conf.dart”, update the “root” variable from ‘vip.ve.atsign.zone’ to ‘root.atsign.org’. This ensures that the project points to the domain that is used in production as opposed to the one for the virtual environment. Replace the existing code in the _login() function with what we wrote above. Double-check that no errors arise (you’ll likely have to tweak the names of a couple of methods in the service file, because some of them begin with the “” private designation). Fire the app on your emulator. Although the dropdown menu will still appear (since we didn’t change any of that code), we will not be authenticating with any of the testable @signs. If you’d like, simply remove the “DropdownButton” widget so that we can eliminate the list of testable @signs. Click on the “Login” button. Assuming that you haven’t previously authenticated with a real @sign, the “Onboarding” widget should prompt you with a request to upload your QR code. Upload the QR code you saved onto the emulator earlier and wait for the authentication to complete. If no errors form, the “Onboarding” widget should take you seamlessly to the “Home” screen, where you can add & retrieve key/value pairs directly from your very own secondary server! The next time you authenticate (i.e. restart the application), the “Onboarding” widget should detect the authentication keys placed in your device’s keychain manager and guide you directly to the “Home” screen.
The Chatting Widget
One of the many things you can do after successfully authenticating an @sign is providing one-to-one text messaging! To do this, you’ll need the at_chat_flutter widget.
The at_chat_flutter widget offers a messaging experience that is unique to the @platform. In a traditional messaging application, your texts are stored in a remote database and the person you’re pinging pulls the texts from there (a bit unsettling if you think about it). Of course, there is no such thing as a remote database in the @platform, so we had to be a bit clever coming up with a messaging scheme. In a nutshell, your text messages are not “sent” but rather “shared” with another @sign. All your texts are stored securely in your secondary server and never leave; if you decide to send a message to someone, that person is given permission to view that text via the notify verb, which will be covered in the next section on advanced @platform verbs.
Learn more about the chatting widget here!
Note
This dependency value may not be up-to-date so be sure to check it out on our pub.dev!Use this package as a library
at_chat_flutter: ^1.0.1
Although this messaging dynamic might sound a bit involved, set up is quite easy! To get a feel for using the “Chatting” widget, it’s best to follow along with the at_chats demo application.
The general flow of all @platform widgets is onboarding an @sign => initializing the service object => creating the actual widgets. Assuming we’ve already onboarded an @sign, let’s look at the steps to initialize our chat service:
(The following code snippets are taken directly from at_chats. While there will be explanations, don’t worry too much about all the variables!)
getAtSignAndInitializeChat() async {
 /// In the at_chats app, the onboarded @sign is displayed at the top
 /// of the Second Screen. We set that @sign to [currentAtSign].
 String currentAtSign = await clientSdkService.getAtSign();
 /// Set [activeAtSign], which is the variable that gets displayed, to
 /// [currentAtSign] using setState(() {}).
 setState(() {
   activeAtSign = currentAtSign;
 });
 /// Initialize a List of Strings called [allAtSigns] that we will
 /// eventually display in the dropdown on the Second Screen. Here, we
 /// simply pull an existing List from the at_demo_data dependency.
 List<String> allAtSigns = at_demo_data.allAtsigns;
 /// We want to remove the [activeAtSign] from this List because we
 /// can't chat with ourselves!
 allAtSigns.remove(activeAtSign);
 /// Again, call setState(() {}) to assign [allAtSigns] to the
 /// variable [atSigns] that will be used in the dropdown widget.
 setState(() {
   atSigns = allAtSigns;
 });
 /// This is the only at_chat_flutter related function!
 /// initializeChatService takes in an AtClientImpl instance, the
 /// currently onboarded @sign, and the root domain for this project.
 /// As its name suggest, this function will prepare the chat service
 /// for us.
 initializeChatService(
     clientSdkService.atClientServiceInstance.atClient, activeAtSign,
     rootDomain: MixedConstants.ROOT_DOMAIN);
}


Because getAtSignandInitializeChat() is an initialization function, it is best to call it in the initState() function at the top of the _SecondScreenState class. The only other thing we need to do before calling the “Chatting” widget is deciding who we’d like to chat with.

setAtsignToChatWith() {
 /// This function is as simple as calling the setChatWithAtSign()
 /// function from the at_chat_flutter dependency with
 /// [chatWithAtSign] passed in! [chatWithAtSign] is simply the @sign
 /// that a user selects from the dropdown on the screen.
 setChatWithAtSign(chatWithAtSign);
}
We won’t want to call setAtsignToChatWith() in initState() because the function won’t know which @sign we’re communicating with until the individual selects it from the dropdown widget. Instead, it makes the most sense to place this function in the button (FlatButton for the at_chats app) that determines the navigation to the next screen. For at_chats, clicking the “Chat options” FlatButton will check to make sure that the “chatWithAtSign” variable is populated before it calls setAtsignToChatWith() and switches the “showOptions” variable to true, which allows the individual to see the two options for viewing the chatbox.
Now, for the moment of truth: once we’ve initialized the chat service, how do we create the actual chat screen? In most tutorials, you’ll probably be guided through a UI-heavy demo of different chatbox components and pairing a backend service. With the @platform, however, it’s really just one line of code:
(This snippet is directly from third_screen.dart in the at_chats project!)
class _ThirdScreenState extends State<ThirdScreen> {
 @override
 Widget build(BuildContext context) {
   return Scaffold(
     appBar: AppBar(title: Text('Chat')),
     /// You can simply set the body parameter of Scaffold widget
     /// to the ChatScreen widget from the at_chat_flutter dependency!
     body: ChatScreen(
       /// Optional parameters to customize your ChatScreen widget.
       /// You can find the full list of parameters in our Github
       /// under the at_widgets repository.
       height: MediaQuery.of(context).size.height,
       incomingMessageColor: Colors.blue[100],
       outgoingMessageColor: Colors.green[100],
       isScreen: true,
     ),
   );
 }
}
By initializing the chat service and calling the ChatScreen() widget, you can make a fully-functioning one-to-one messaging application! While the ChatScreen widget offers a number of ways to customize your chatbox, if you’d like to build your own widget from scratch, you can use the at_chat_flutter dependency as a basis for creating your personal chat library that works with the @platform.
The Contacts Widget
Too many @signs to keep track of? That’s no problem with the at_contacts_flutter widget! Simply add the at_contacts_flutter dependency to your project, and you’ll be capable of performing several actions with your @sign contacts.
Learn more about the contacts widget here!
Note
This dependency value may not be up-to-date so be sure to check it out on our pub.dev!Use this package as a library
at_contacts_flutter: ^1.0.0
In order to implement the at_contacts_flutter widget, you must first, of course, create an AtClientService instance and authenticate an @sign.
After you have successfully onboarded an @sign, you can add a page where you may choose to show your contacts or show your blocked contacts. On load of this page, you will want to initialize the contacts service, similar to initializing the at_chats service. The contacts service needs to be initialised with the atClient from the AtClientService, current @sign, and the root domain.
initializeContactsService(
clientSdkService.atClientServiceInstance.atClient,
activeAtSign,
rootDomain: MixedConstants.ROOT_DOMAIN);
After successfully initializing the contact service, you will now be capable of getting the list of contacts that exist for the authenticated @sign. This is as easy as simply passing the contacts into a variable.
var _result = await _contactService.fetchContacts();
This fetchContacts() function exists in the _contactService file, which can be found within the at_contact’s ‘services’ folder. If you want to do more than just get the list of contacts, you have the capability of adding more contacts to this list, in addition to removing or blocking any. In order to retrieve the list of blocked contacts, it is similar to retrieving the regular list of contacts. The code from the example app demonstrates this well.
Class BlockedScreen extends StatefulWidget{
  @override
  _BlockedScreenState createState() => _BlockedScreenState();
}

class _BlockedScreenState extends State<BlockedScreen> {
  // Here, we are initializing a ContactService object in order
  // to call our list of blocked contacts later within our widget.
  // Refer to how the list is populated within the example app
  ContactService _contactService;
  @override
  void initState() {
    _contactService = ContactService();
    _contactService.fetchBlockContactList();
    super.initState();
}
To block a contact, it is as easy as calling the blockUnblock method. If a contact is blocked, it will unblock the contact. If the contact is not blocked, it will block it for you.
await _contactService.blockUnblockContact(contact: _atSign_you_wish_toBlockUnblock);
After you block a contact, you may wish to have that contact removed from the list. All you have to do is simply implement the code below:
await _contactService.deleteAtSign(atSign: _atSign_you_wish_toRemove);
Along with the previously stated functionalities, the at_contacts_flutter package also provides the UI so there’s no need to set up a separate page to house these functions!
The Location Widget
One of the more common mobile application features is geolocation. Even if your app doesn’t explicitly use a map, with an individual’s permission, you can use their location for a variety of relevant recommendations like shops, restaurants, and nearby events. The at_location_flutter dependency is a powerful abstraction for geolocation with the @platform, and we’ll see some use cases of its most common functions.
Learn more about the contacts widget here!
Note
This dependency value may not be up-to-date so be sure to check it out on our pub.dev!Use this package as a library
at_location_flutter: ^1.0.3
Once we’ve successfully onboarded an @sign, let’s initialize our location service. For this subsection, we’ll base our code off of the example app in the Github directory for at_location_flutter.
initService() {
 /// A different way to call the currently onboarded @sign. In
 /// practice, it is better to write a getAtSign() method in your
 /// project's service file. This variable is used to display the
 /// onboarded @sign at the top of the screen.
 activeAtSign =
     clientSdkService.atClientServiceInstance.atClient.currentAtSign;
 /// initializeLocationService() is a function from
 /// at_location_flutter that's located in init_location_service.dart.
 /// This function takes  in an AtClientImpl instance, the currently
 /// onboarded @sign, a GlobalKey to access the NavigatorState (for
 /// navigating between routes), and the domain we want to point our
 /// project to.
 initializeLocationService(
     clientSdkService.atClientServiceInstance.atClient,
     activeAtSign,
     NavService.navKey,
     rootDomain: MixedConstants.ROOT_DOMAIN
 );
}
As is the case with most @platform widgets, you can call this initialization function in the initState() function of your class.
Once our location service is ready to go, you can let the authenticated individual freely send and request locations to/from other @sign customers. These capabilities are made possible with the “sendShareLocationNotification” and “send RequestLocationNotification” functions (which exist in the init_location_service.dart file).
ElevatedButton(
 onPressed: () async {
   /// checkAtsign() is a helper functions that ensures the entered
   /// @sign (for sending/requesting a location) is valid. It is
   /// unique to the example app in the at_location_flutter Github
   /// directory.
   bool result = await checkAtsign();
   if (!result) {
     CustomToast().show('@sign not valid', context);
     return;
   }
   /// This function takes in the @sign receiving the location
   /// notification as well as the duration (in minutes) of
   /// how long this shared location persists on the receiving
   /// @sign's secondary server.
   await sendShareLocationNotification(receiver, 30);
 },
 child: Text('Send Location'),
),
ElevatedButton(
 onPressed: () async {
   bool result = await checkAtsign();
   if (!result) {
     CustomToast().show('@sign not valid', context);
     return;
   }
   /// Similar to the previous function,
   /// "sendRequestLocationNotification" needs the @sign to
   /// request a location from.
   await sendRequestLocationNotification(receiver);
 },
 child: Text('Request Location'),
),
While the above two functions are certainly useful, there is another widget in the at_location_flutter dependency that offers a more elegant UI for sending your location, requesting locations, and even visualizing your current position. That widget is called “HomeScreen”.
/// When an individual clicks on the ElevatedButton that says “Show
/// map”, the Navigator will lead them to the HomeScreen().
ElevatedButton(
 onPressed: () {
   Navigator.of(context).push(MaterialPageRoute(
     builder: (BuildContext context) => HomeScreen(),
   ));
 },
 child: Text('Show map'),
),
The HomeScreen displays a map with your location and offers two options (contained in “Task” widgets) that provide more user-friendly versions of the “sendShareLocationNotification” and “send RequestLocationNotification” functions (if you’re curious, these more elegant widgets are called ShareLocationSheet() and RequestLocationSheet() respectively). When you click on one of these tasks, a popup will appear to enter a receiving @sign (and duration for sharing a location), and any task you complete will appear in the bottom white region of the screen with its current status.
That’s all for the “Location” widget! If you want to test the at_location_flutter dependency for yourself, feel free to start by cloning the example app from the at_location_flutter Github repository. For more intricate functions like the location notification stream, our Github would be an excellent place to learn more.
The Events Widget
Like how we regularly share calendar items between our friends, family, and colleagues, it would be very convenient to have a data structure for events that works with the @platform. This is where the at_events_flutter dependency comes into play.
Learn more about the events widget here!
Note
This dependency value may not be up-to-date so be sure to check it out on our pub.dev!Use this package as a library
at_events_flutter: ^1.0.0
The first step, as you very well may have guessed, is the initialization of the event service. Like the previous few widgets discussed above, we’ll be examining snippets from the example app in the at_event_flutter Github directory throughout this subsection.
initService() {
 activeAtSign =
     clientSdkService.atClientServiceInstance.atClient.currentAtSign;
 /// Unlike most of the initialization functions, our event
 /// initializer only needs an AtClientImpl instance and an optional
 /// argument for the root domain.
initialiseEventService(clientSdkService.atClientServiceInstance.atClient,
     rootDomain: MixedConstants.ROOT_DOMAIN);
}
The most important function in the at_event_flutter library is CreateEvent(), which builds an instance of a CreateEvent that can be customized and shared across different @signs:
TextButton(
 onPressed: () {
   /// bottomSheet will return a pop up screen that takes up 90%
   /// of the screen height.
   bottomSheet(
       CreateEvent(), MediaQuery.of(context).size.height * 0.9);
 },
 child: Container(
   height: 40,
   child:
       Text('Create event', style: TextStyle(color: Colors.black)),
 ),
CreateEvent() is a separate screen in the application that guides an individual through a list of fields they can populate to provide information about their event. If you look into the CreateEvent class, you’ll see that these fields are stored in an object called “eventData”, which is an instance of an EventNotificationModel. It’s full list of attributes is below (the ones with comments are used in the CreateEvent class):
class EventNotificationModel {
 EventNotificationModel();
 String atsignCreator;
 bool isCancelled;
 /// The title of the event.
 String title;
 /// A location serving as the event's venue.
 Venue venue;
 /// An object that stores info like event date, start time, and repeat duration.
 Event event;
 String key;
 AtGroup group;
 bool isSharing;
 bool isUpdate; //when an event data is being updated , this should be true.
 ...
}
“eventData” is a crucial data structure that’s used not just in creating an event but updating and deleting events as well. The init_events_service.dart file illustrates a variety of functions that can be used to perform useful actions on these objects.
One important feature of the example app is its EventList class, which doesn’t come directly with the at_events_flutter dependency:
TextButton(
 onPressed: () {
   Navigator.push(
     context,
     MaterialPageRoute(
       builder: (context) => EventList(),
     ),
   );
 },
This seemingly harmless class is actually doing quite a bit of work behind the scenes! EventList listens to an event stream that comes from an EventService object (a class within the at_event_flutter dependency) and displays them in a ListView format. Clicking on one of these events, you’ll be navigated to a popup of a CreateEvent instance with its “isUpdate” parameter set to true. This allows you to edit and save any event of your choice!
The Backup Keys Widget
When someone uses their @sign for the first time with an @platform app, it is important to have them authenticate with their generated QR code and create a set of backup keys just in case the ones in the keychain manager are lost or if you want to use the same @sign on a different device. The backup keys widget occurs during the “Onboarding” widget.
Learn more about the events widget here!
Note
This dependency value may not be up-to-date so be sure to check it out on our pub.dev!Use this package as a library
at_onboarding_flutter: ^1.0.0+4
You may notice that in order to get the at_backupKeys_flutter package, you can simply pull from the at_onboarding_flutter widget which houses the at_backupkeys_flutter widget! See below the process of at_onboarding_flutter to see where at_backupkeys_flutter comes into play!
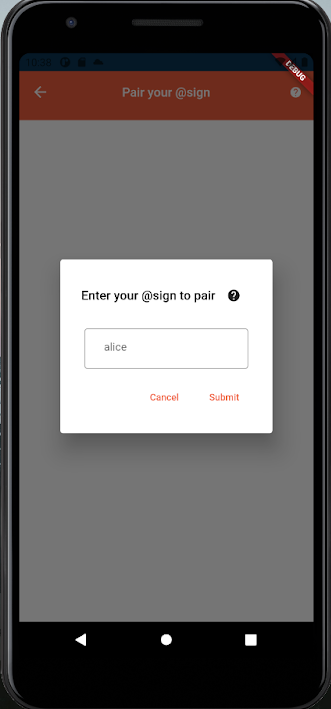
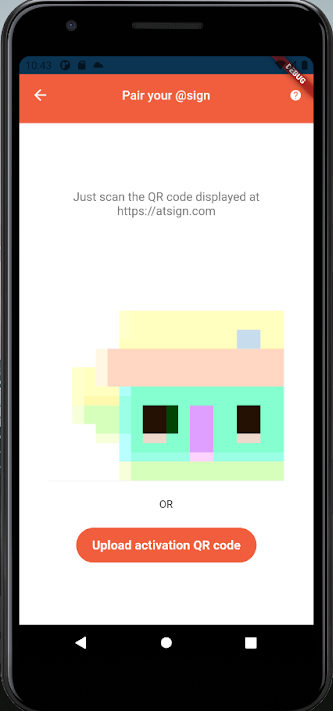
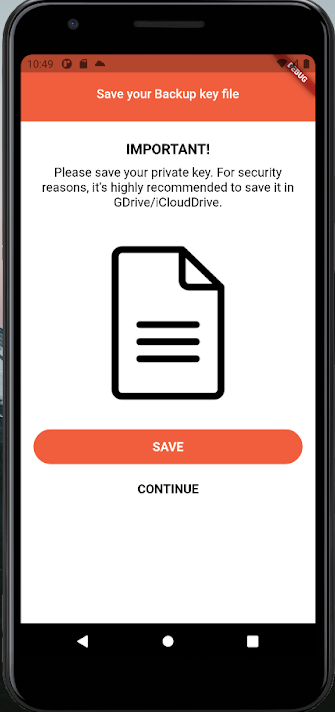
After inputting what @sign you wish to pair, you will need to upload the QR code retrieved from atsign.com. The emulator in the picture is not hooked up to a camera, so a small GIF of a house is there to fill where the camera would be. After successfully uploading and authenticating with the QR code, the backup key widget will be introduced to you! From the save option, you will be prompted to either save your keys to the files folder of the device or upload the keys to an associated Google Drive.
Fortunately, implementing the backup key widget is painless as it is a part of the onboarding widget! If you have already implemented the onboarding widget, there’s no code you need to write!
at_onboarding_flutter
A flutter plugin project for onboarding any @sign in @protocol apps with ease. Provides QRscanner and upload key file option to authenticate.
at_chat_flutter
A flutter plugin project to provide chat feature using atsigns and atprotocol.
at_common_flutter
A flutter package to provide common widgets used by other atsign flutter packages.
at_backupkey_flutter
A flutter plugin project for saving backup key of any @sign that is being onboarded with @protocol apps. Backup key can used to authenticate in any @protocol apps.
at_contacts_flutter
A flutter plugin project to provide ease of managing contacts for an atsign using atprotocol.
at_contacts_group_flutter
A flutter plugin project to provide the group functionality with contacts using atprotocol.
at_location_flutter
A flutter plugin project to share location between two atsigns and track them on OSM (open street maps).
at_events_flutter
A flutter plugin project to manage events using the atprotocol.