Working With Hugo (Static Webpage Generator)
7 minute read
What is Hugo?
Hugo is a static site generator that you can read more about here.
Have Hugo set up already?
Click here to get atsign.dev running on your machine.
Windows:
Installing Hugo on Windows:
There are a few ways in which you can get started with Hugo, however the easiest way I have found to getting started and jumping straight into things is by the following steps:
Create a directory in a location on your drive. Next, rename this folder to ‘Hugo’. After this, navigate inside of your Hugo folder and create another folder within it, this time calling it ‘bin’.
You’re now ready to download Hugo on to your machine. As most projects which are open-source can be found on GitHub, so can Hugo’s releases. In any web browser, navigate to the GoHugoIo repository. Here, you will find a great list of all of the releases catered for Windows, Linux, and MacOS. Be sure to select a release that has your operating system in the title. For example, I am using a Windows 10 machine that runs a 64 bit processor. So I navigated to the zip file titled hugo_extended_0.83.1_Windows-64bit.zip.
Note: The release number may be different from the one listed above due to the time at which this documentation was written.
You may also have noticed that I have chosen the extended Hugo version. Hugo extended has more capabilities, especially for thematic purposes. Hugo’s extension comes with a few advantages such as; SASS/SCSS support, Minify javascript and css, resource catenation, source mapping, image processing and so much more. A more in depth view of it can be found here.
Once you have found the matching release title for your machine, feel free to simply download the zip file. Where you download the zip file does not matter, however, where you extract it does. When your download is complete, select ‘Extract all’ and be sure that you extract the contents of what you downloaded into the ‘bin’ folder that exists within your Hugo folder. Once the extraction is complete, it should look something like this:
For the release that I have downloaded and extracted, there are three files. Perhaps in a later release of Hugo, there may be more files included, but for now, as long as you have the application file titled ‘hugo’, you will be fine. If, for whatever odd reason, the ‘hugo’ file is titled something else, be sure to rename it to ‘hugo’ (note the lowercase ‘h’). There is also a license file and a readme. It is completely up to you if you read the readme and license files.
Determining if your Installation on Windows was successful:
To make sure that your Hugo was successfully installed and extracted, open your command prompt [Some ways in which this can be done => (Win key + r, type ‘cmd’, hit ‘enter’), (Go to your Search bar and the bottom of your taskbar and type in ‘cmd’ or ‘command prompt’ and hit ‘enter’)] and navigate to the directory where you extracted Hugo. For the above picture, my hugo.exe file’s location was D:\Hugo\bin\hugo.exe, so all I have to type is ‘cd D:\Hugo\bin’ and I will be taken to where the hugo.exe exists. If you’re not sure where you had saved your Hugo folder, you can either use the File Explorer you have presently open and simply highlight the path that is in the bar above your currently open Hugo folder. I have circled it below for your convenience.
To show what your command prompt should look like:
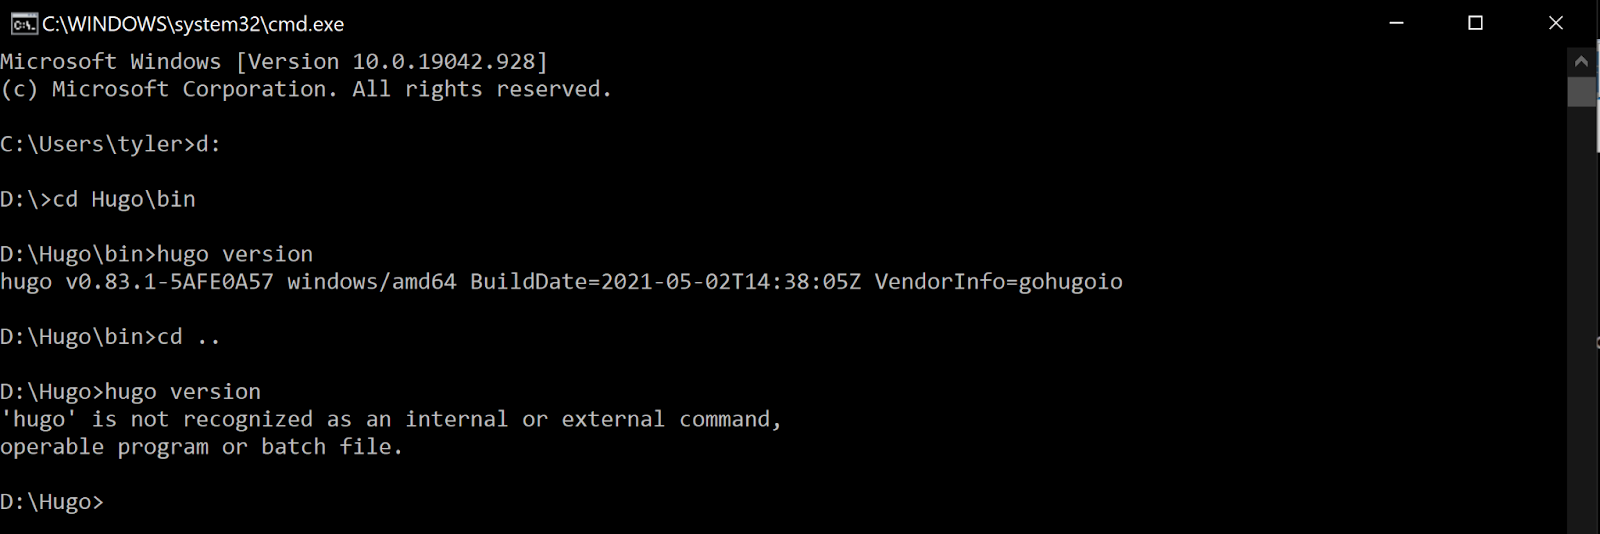
Once you are here, feel free to try the command ‘hugo version’:
If your command prompt happily prints out the current version of Hugo you have on your machine, this means you have successfully installed and extracted Hugo onto your machine. However, you may notice that if you use the command ‘cd ..’ to move directories to the ‘Hugo’ folder rather than ‘bin’ and try the command ‘hugo version’ you will be hit with an error or Windows will tell you that hugo isn’t a recognized command.

If you are like me, and wish to be capable of using the hugo command anywhere on your machine, maybe because you would like to create a web page with its own folder and its own content, there is an easy way to fix this.
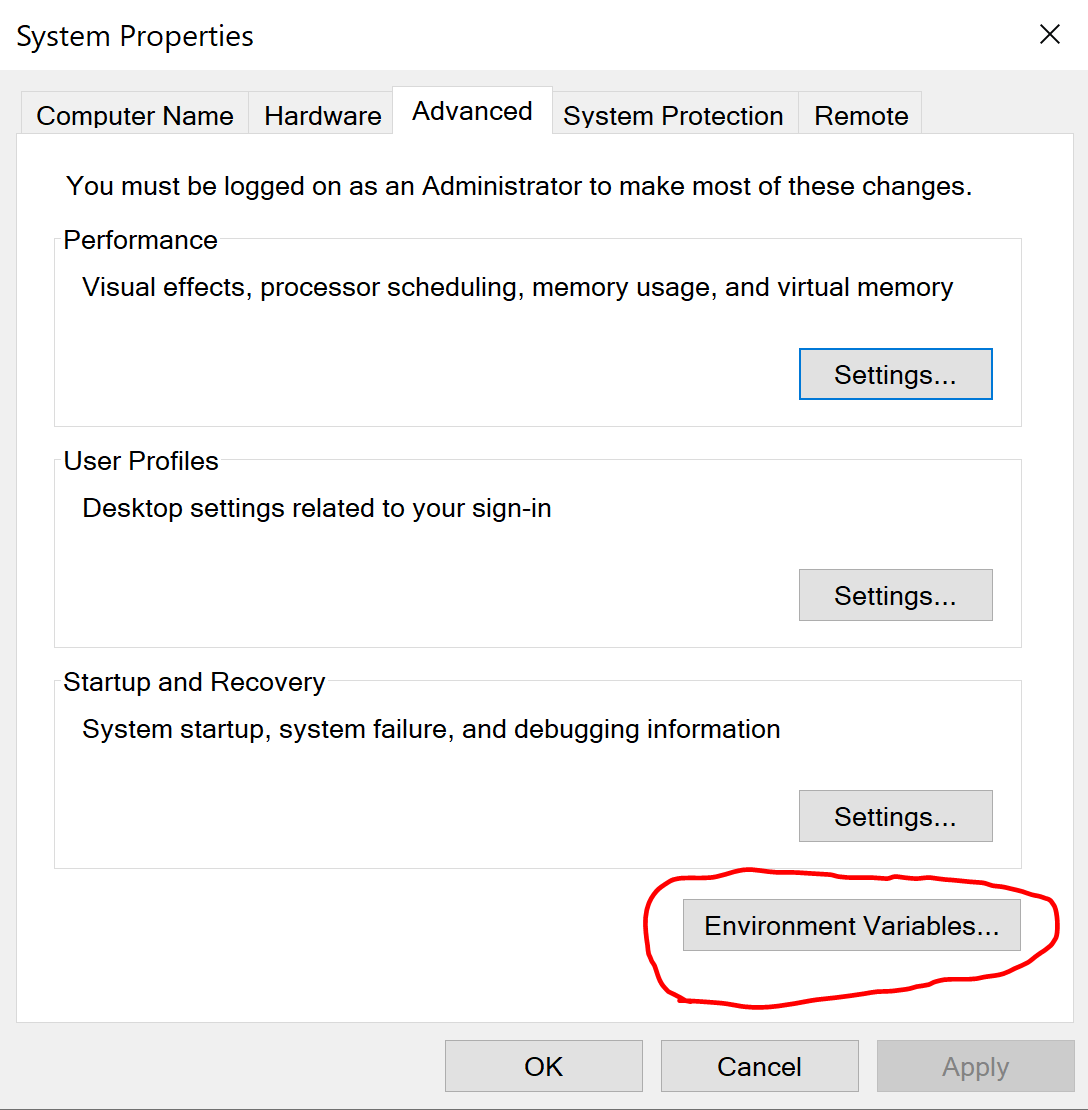
What you will have to do is navigate to your ‘Search’ bar and type in ‘env’ or ‘environment’. Windows will suggest the ‘Edit the System Environment Variables’. Open it and a System Properties dialog box should appear and look something like this:

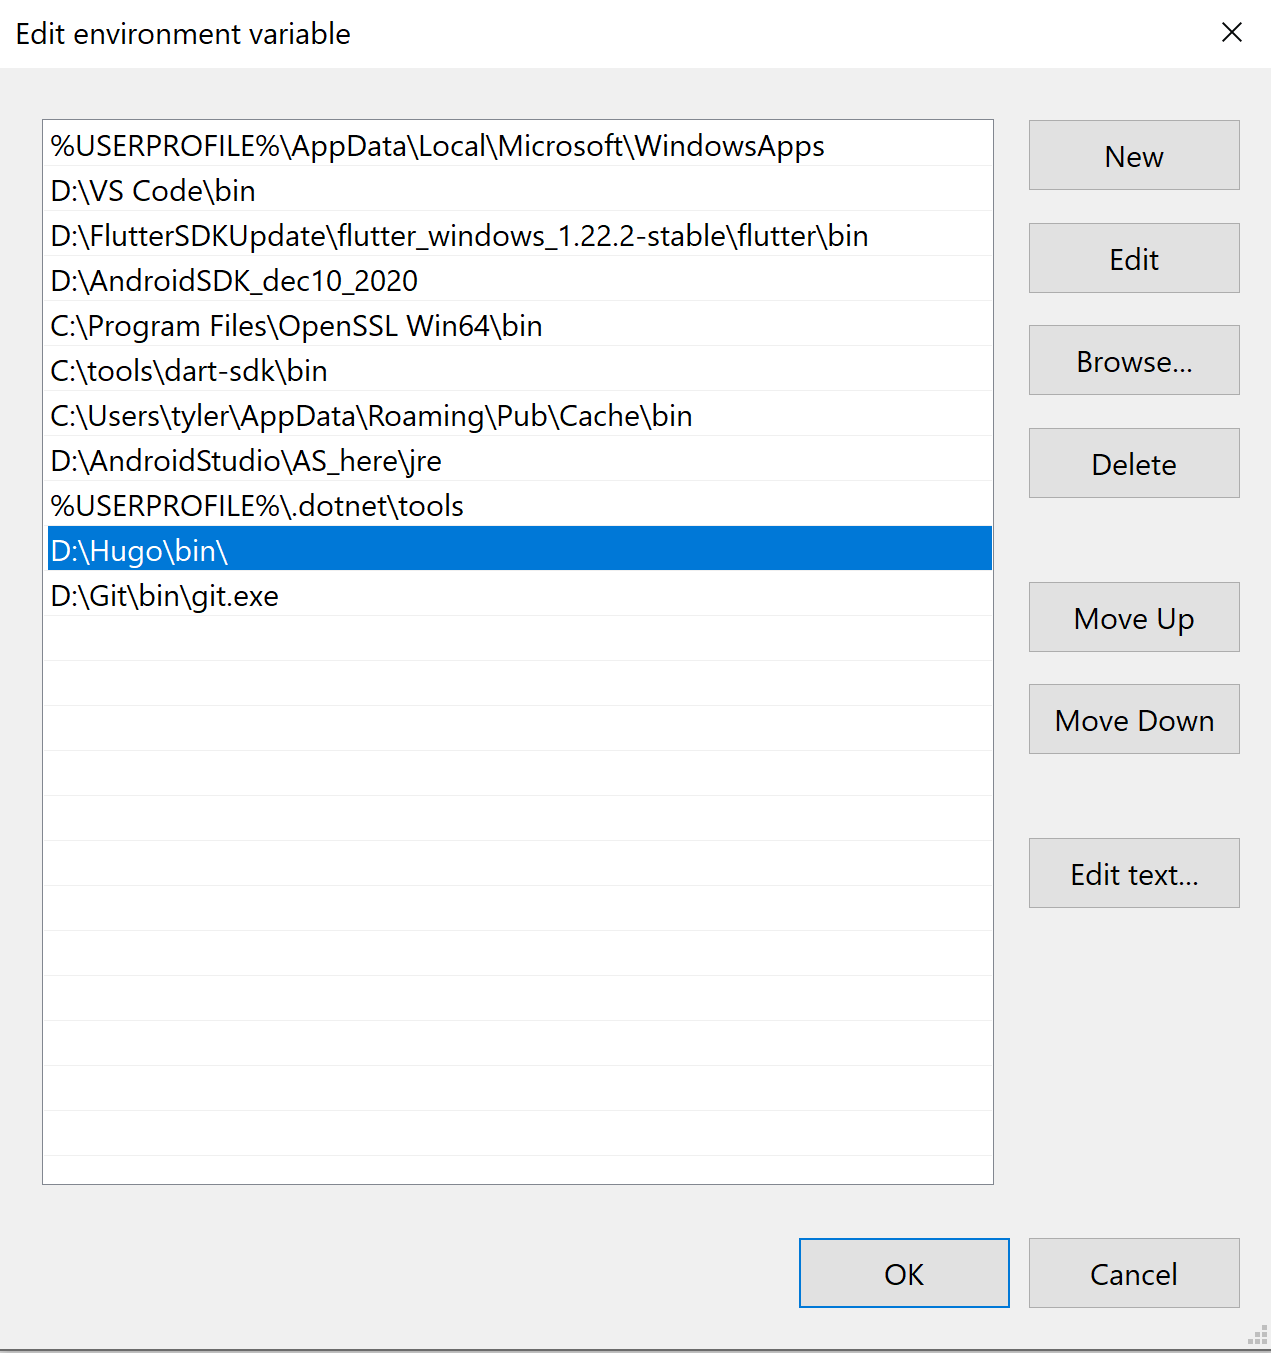
Double-click on the button labeled ‘Environment Variables’ and this will open the dialog box where you can edit the environment variables of your machine. You may be wondering what environment variables are and what they’re for. In simplest terms, just like how you noticed that your hugo command did not work outside of the bin folder, there are other applications that work the same way and will only work in the folder they exist in. Windows has the capability of allowing you to run the application from anywhere, which is exactly what we would like to do. You should see something in your ‘user variables’ called Path. Each Path that is listed, is more than likely an application, similar to your Hugo, that exists only in a folder but is used globally on your machine. Highlight ‘Path’ and click ‘Edit…’. This will open a new dialog box that will list the individual paths that already exist. Click ‘New’ and simply type (or paste) the location of your hugo.exe. If you may recall from my example, my hugo.exe was in the following location; D:\hugo_ext\bin.

Here’s what mine looks like after I have finished typing in where it exists (it is the one highlighted in blue). After you have done the same, you can now click ‘OK’ until all of the dialog boxes are closed. Now this is where the magic happens! After restarting your computer, try using the ‘hugo version’ command again outside of the ‘Hugo\bin’ folder and see if Windows recognizes it as a command! I simply started up my command prompt and immediately typed in ‘hugo version’ and it worked. If the command works, you are now ready to get started on a Hugo project.
Mac:
Installing Hugo on Mac:
The first step you will want to take is navigating to the website Homebrew. This website is a package manager and allows you to install, download and manage packages. You can use Homebrew to install Hugo easily on your computer. Once you are taken to the landing page, you should come across a terminal command that looks like:
/bin/bash -c "$(curl -fsSL https://raw.githubusercontent.com/Homebrew/install/HEAD/install.sh)"
Note: This command may be updated depending on any new releases, so be sure to check the website before copying the line of code above!
Simply paste the line of code into your terminal. Once you click enter and input your password for administrative access, Homebrew will begin installing itself onto your machine. This can take a few minutes. Once Homebrew is finished, you can then type the command:
brew install hugo
Homebrew may update itself automatically before installing hugo.
Determining if your Installation on Mac was successful:
You can validate your install by the command:
which hugo
You can also use the command:
hugo version
If you run into an error, be sure to reread the steps carefully as you may have missed something or read through the Hugo set up steps in their own documentation in case this is out dated.
Set up atsign.dev on your machine
Note: Be sure to FORK (not sure how? Follow these steps) our atsign.dev repo before following these next steps.
Within your command prompt/terminal, navigate to the cloned repo directory and run the following commands to start up your Hugo local server:
git submodule update --init --recursive
hugo server
Git submodule update will pull the at_docsy repo’s contents and add them to a created folder titled at_docsy under your themes folder. This pulls the layout and theme structure of our developer site. Hugo server will launch a local version of atsign.dev for you.
Note: The hugo server command may fail and there are numerous reasons for this! We have a document that details known issues here along with their solutions.
After this, you can now open any web browser and type in the URL:
You should now see atsign.dev running on your web browser! From here, if you wish to contrbute, I recommend reading through our ‘Contributing to an Open-Source Project’ document!